Tampilkan postingan dengan label construction. Tampilkan semua postingan

Minggu, 24 Juli 2016

Sailing Model AMYA Star45 Class Construction Deck s Hatches

from John Fisher:
Attaching deck to hull
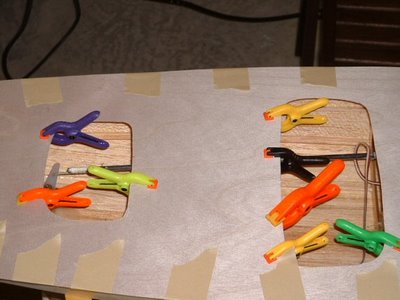
John Fisher photographer


Hull with deck mounted:
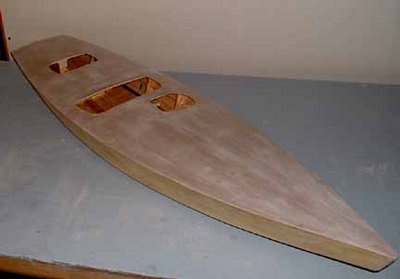
John Fisher photographer


--------------------

HATCHES:

From Phil Geren:
The simplest hatch cover solution I have found for Star 45 is to cut a piece out of Presentation Cover vinyl, which cut-out is shaped like the hatch opening but 1/4 or 3/8 of an inch larger on all sides. Then, apply electricians tape (1/2 or 3/4" wide) all around the perifery, so that half the tape is on the vinyl and half is hanging over the edge.

Presentation Cover vinyl which I get at Office Depot is about 15 cents a sheet; it is about 0.008" thick; it is slightly over 8.5X11" in size; a full sheet weighs about 16 grams; it is stiff, but flexible; it is crystal clear, but if you want it opaque, just wet sand it with #400 grit wet or dry sandpaper.

Position the hatch cover over the hatch so that the tape extends evenly past the hatch opening an equal distance all around, and then just press on the tape to stick it to the deck. Its waterproof, durable.

You can make spares and stick them to another piece of vinyl and carry that with you to the races. That keeps spares nice and flat and keeps the tapes sticky side clean for future use. A set of these hatch covers usually lasts me all season. At lunch, I take one cover off to allow the boat to dry out, sticking the cover to a dry vinyl sheet to keep the tapes sticky side clean.

Photo is Star 45 #778, freshly rebuilt for the Nationals this year, and a set of covers on the floor next to her.
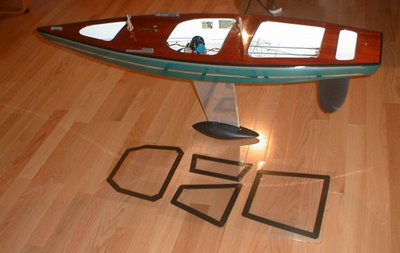


Phil Geren photographer


--
from Uncle Dave:
I pulled one of my old Star45s from the attic and have it here in my workshop. It has a fiberglass Sirius 45 hull, a aircraft ply deck and aluminum keel fin. Unfortunately it is not one of my finest examples of workmanship or painting. However Ill suffer the embarrassment and use if to show some one style of hatch construction.

Carrying around a model around out of the water is no big deal. Taking a model out of the water can be something else. You first need to hang onto the model. Then find a place to take hold to lift the model. This is one of the reasons I have used easily removable hatches. You can grab the model through the hatch, fingers under the deck and pick it up. Of course a thin ply deck the model deck and hatch construction needs to be strong enough to withstand pulling on the deck and lifting a twelve pound plus model. Therefore I braced my decks around hatch areas.

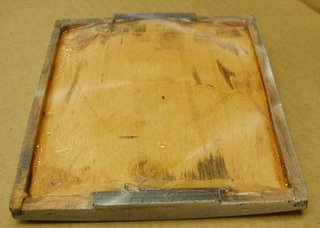
First I built a flanged frame for the hatch to sit in that also extended under the deck and attached to the deck bracing.
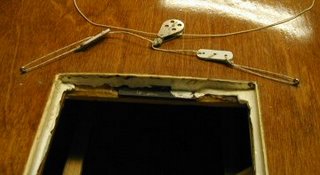
dlm_hatch_a.jpg

Then I built a hatch cover based on the size of the hatch. Initially the hatch cover was made to fit very loosely in the hatch. I then took some silicone (tub seal or similar) squeezed a bead around the shelf/lip of the hatch. The covering the hatch opening with food wrap poly sheeting Id push the hatch cover in place down into the silicone. This made a nice water tight gasket around the edge of the hatch. After waiting a day Id remove the plastic, trim and silicone that showed topside. With the silicone dry, pop the hatch cover in place and check the fit.
dlm_hatch_b.jpg

I placed a strip of magnetic tape on either end of the cover and on each end of the hatch frame.
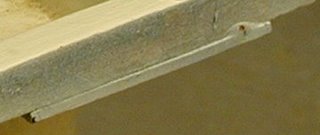
dlm_hatch_c.jpg

When the hatch cover and hatch mag tapes touched they pulled together. This magnetic tape is neat stuff you can pop the cover in place and it will stay put.

Typically I made my hatches about 4"X5" giving me plenty of deck to the sheer.
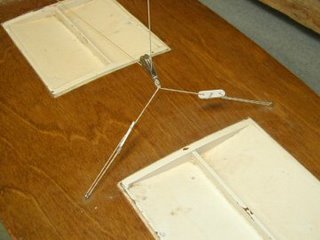
fixed_travelersml.jpg

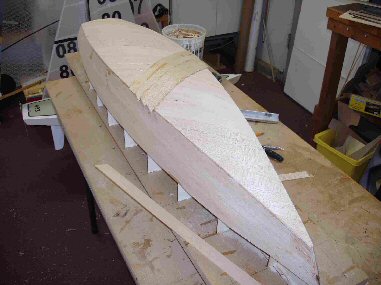
I heavy weather if the model might go over on beams end Id cover the seams with tape just to be extra watertight. A 4X5 hatch gives room to get inside, adjust winch, radio etc, and to remove any water that got into the bilge while sailing.

Read More..

Rabu, 20 Juli 2016

Star45 What is a hull Daves construction categories unofficial

Model Sail Boat Building, How To Build A Wooden Star45 R/C Sailing Model: What is a hull ? and construction categories
A composite hull:
a hull constructed of wood and covered with reinforced plastic (cloth impregnated with resin).

OR:
a hull constructed using a laminate (sandwich) consisting of reinforced plastic (cloth impregnated with resin) on two sides of a core . Core materials may be foam or wood.
Read More..

Sabtu, 09 Juli 2016

star 45 construction double diagonal planked hull

Model Sail Boat Building, How To Build A Wooden Star45 R/C Sailing Model
star 45 construction | double diagonal planked hull
From: "John Fisher"

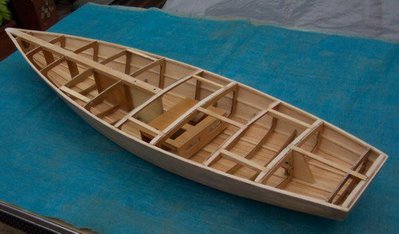
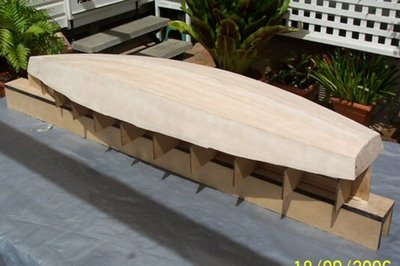
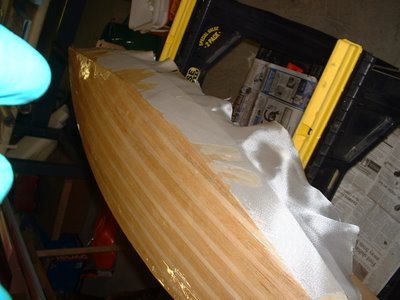
Here are some photos of Sherwood Jones Star 45 with double diagonal bottom planking. He used two layers of 1/16 planking. The planks are 1" wide. He then covered it with 1 ½oz glass. Weight is about the same as mine with the 1/16 longitudinal planks and two layers of 3.2 oz glass. Just goes to show that there are multiple ways to solve a problem.
John
Read More..

Sabtu, 11 Juni 2016

Little Egret Construction Progress

Im sorry that it has been a few weeks since I last wrote a post, but Ive been very busy with a whole range of activities - not just boat related - which have prevented me from sitting down to write. In addition I been feeling a bit blocked for things to write about. It isnt that there is a shortage of subject matter - it is just that depending on mood, I sometimes find it difficult to write in a way that I think is interesting to readers. Ive been writing articles for every issue of a print magazine for the last twelve years, and now for this blog, and I can assure you that it isnt easy!

Anyway, here is a bit of what has been going on: -


Back in late October 2011, I mentioned that I was in the process of designing an "Egret-style" sharpie/dory for John Hockings in Brisbane, Australia. In early December 2011, I reported that John had commenced construction. Since then, John has been making very rapid progress and the boat is looking great. The photos have been taken with a relatively wide-angle lens so the boat looks smaller than she really is in the flesh.

Here is the hull viewed from the stern with gunwales, mast partners, mast steps, and centreboard case fitted. Side deck carlings are being sprung into place, with temporary cross-braces to hold them in against the twisting, bending, and edge-setting forces.
A photo from very early in the construction process which gives a good impression of the hull profile - bow is to the right of the picture.
A view of the interior during the application of a thinned epoxy (Norseal). The photo has been taken from the stern and you can see the mizzen mast location at the aft end of the centreboard case.  The floor timbers (transverse frames on the bottom) will carry floor-boards in the finished boat, allowing passengers to sleep above any bilge water, and to give a nicely textured footing during normal sailing and poling. Note the seat risers which allow positioning of thwarts in many locations.
One topside panel cut and material for the second one waiting to be worked on. The panel shapes are precomputed and dimensioned drawings are supplied with the plans, allowing the boat to be built without any sort of mold or strongback.
View from the bow, with the first undercoat applied. Mast step in the foreground is for the third mast location, which will take either the main mast or the mizzen mast, allowing the boat to be sailed with a single sail if desired.
Another photo of the boat being undercoated, this time viewed from the stern with the main mast partner visible in the background.
This boat is an exciting prospect as far as Im concerned. She will be rugged and yet is an easy project for any capable builder. John has been doing an exceptionally good job of building her and I really look forward to seeing how she handles the rough stuff as well as the thin water for which she is very well adapted.
Read More..

Minggu, 05 Juni 2016

Star 45 Construction Planking with edge glueing

[Star45] Update on planking bottom with edge glueing.

John Fisher is ready { 4/19/2007 } to glass his latest boat and is sharing how he planked it. His dad built a ply sided, cedar planked star using titebond II and it came out pretty light and stiff. With this information I started to build another hull using the same materials. He felt that edge gluing the planks added a lot of the strength to his boat. John didnt want to glue in extra wood to hold the pins to keep the planks in place for the glue to dry, so I combined two methods of planking. John liked the quickness of planking with CA and kicker, but it lacked stiffness when sanding the bottom before glassing. So he decided to edge glue the planks and then tack them in place to the frames with CA.

In this photo you can see where John put drops of CA on the planks. The wood is slightly darker.


It worked well. John has an edge glued bottom and he was able to plank it in one evening. To do this John first spray the frames with kicker, then apply titebond III to the edge of the planks. He then would hold the plank in place, tight against the previous plank, and apply a drop of CA to each frame to hold it in place. It did not matter where John started, bow, stern, or middle, but do make sure the CA has set up before moving to the next frame. Once the whole plank was in place he came back and wiped off the extra titebond. To fair the bottom to the sides he used a $10, 6" plane from home depot set at .010" depth of cut. It quickly removed the cedar and a little sanding finished the job.

John had one plank that was too thin that he had to remove, it was harder than expected. He had the use quite a bit of force to break the glue joint at each frame, so he is confident that this method is strong. John will also use this for balsa planked bottoms.

In photo # 10 you can see the stern still needs to be trimmed and sanded. John will probably use a saw to trim in close and then sand to fair it.
Read More..

Senin, 30 Mei 2016

What is a hull and construction categories

Dave Mainwarings definitions

HULL defintion of:
The outer shell, including frames, ribs, interior bulkheads, exclusive of masts, rigging, deck and equipment.


"bare hull" defintion of:
A model boats outer shell, EXCLUDING, ribs, interior bulkheads, exclusive of masts, rigging, deck and equipment. Example. A fiberglass hull as pulled from a mold.

--

A wooden hull:
one constructed of wood (including plywood).


--
A glass hull:
one constructed of reinforced plastic (cloth impregnated with resin). Nominally referred to as a fiberglass hull.

--
A composite hull:
a hull constructed of wood and covered with reinforced plastic (cloth impregnated with resin).
OR:
a hull constructed using a laminate (sandwich) consisting of reinforced plastic (cloth impregnated with resin) on two sides of a core . Core materials may be foam or wood.
Read More..

Selasa, 17 Mei 2016

Construction Star 45 Sail Making colored sails sail material

Apr 2007 Subject: [Star45] Sails - colors
--
From: "Larry Ludwig" mailing list Star45@yahoogroups.com

You can have colored sails. You can make your own from ripstop and the colors are all available. The material is inexpensive enough that even if you do botch the first few attempts its not going to set you back more than $10.00

Learning to make sails teachs you more about TRIMMING sails and the way they take a "set" than sailing a boat ever will.

If you set your mainsail luff as a bolt rope (and you should IMHO) then it takes only a few seconds to pop off your mast head or foot, slide out one sail and slide in the other. Then if your jib is setup as a hook attachment to a hole in the mast, you unhook from the deck, unhook from the mast and voila, you are ready to hook both ends of the 2nd sail and you are complete. You should be able to change the sails on your boat in 2 minutes if you are properly set up. Of course, using a 2nd mast and complete rig is even faster. If you setup so your turnbuckles remain on the deck, then they are ready to go regardless of which rig you chose, and you reduce the cost of a 2nd rig by $40 right there.

Dont discount ripstop sails too much. They may not be all the rage... but I promise you the skipper skill factor is WAY more important than the sail material. I have rip stop sails here that have lasted 20 years, if they are well cared for, they will last. Skippers familiar with the Vic class will remember a Regional Regatta being won with a stock ripstop mainsail last year ( I think it was)

Give it a shot, you wont be sorry you did. *and it DOES look very nice on your boat.
--
From: "J Fisher" Sender: Star45@yahoogroups.com Subject: Re: [Star45] Sails - colors

I have seen people in the 914 fleet use colored markers to color sails. I think it was mostly to tell the boats apart, but there were some interesting designs. You could probably paint your sails as well to get color.
--
From: jfisher@wildblue.net I have made a lot of sail and could put together a step by step to make sails.

I use mylar which I buy from www.McMaster.com. They only carry clear, so I sand it to make it translucent. It colors well with markers so that would be one way to make colored sails. To make sails you can use the sail block based on the method provided on the star 45 yahoo groups by John Whitford or you can use the block from great basin, which is based on the Sweede Johnson sail block. I have used the sweede block with good results.
--
From: "Larry Ludwig" Sender: Star45@yahoogroups.com Subject: RE: [Star45] Sails - colors

You can make panelled sails, but it is not required. You can get PLENTY of use out of a single panelled sail. They actually have some advantages in high winds because of the less draught. Also, but putting in the luff curve and using a bolt-rope main, you do have a sail with some draught to it, not just a flat sheet of cloth. The block method works fine, but also.. is not required. Basically you cut the bottom panel seam flat, and draw your airfoil MAC (mean aerodynamic chord) and cut it with a #9 X-acto or scissors. Use seamstress tape and overstitch. Do the same thing with the luff curve, and hem the foot and leech and you are about there. Oversew some corner panels, tack on some batten pockets and thread in a piece of weed-eater line up the hem of the luff and you are ready to put on your class markings and numbers. Grommets in the corners are installed either with a seamstress tool or they could be ordered from Don Ginther at GBMY if he is still shipping, he was in the process of suspending operations.

Where to find the material? Nylon ripstop is inexpensive... typically $6-$7 (x 38-50" long bolt) a yard at LONDONs Fabrics or HANCOCK Fabrics, sometimes you will find it at HOBBY LOBBY retail stores, but if you check your local fabric store you will most likely come up with some in various colors. Also using contrasting thread colors can make the sail more attractive. Start with a single panel sail and go through all the steps. When you are ready to start making paneled sails... dont be afraid to make them out of paper first. Typical brown paper can be cut and taped together and makes a perfect mock up of the sail for pennies.
--
From: "Al Stein" Sender: Star45@yahoogroups.com Subject: [Star45] Re: Sails - colors

I think I got mine from Potomac Sailmakers in Alexandria, Virginia... I bought yellow and orange, but they had a bunch of different colors in spinnaker cloth, and very light weight and airtight it is.

Its fairly stiff, too, for as light as it is -- something well under an ounce per yard. Price about the same as Larry experienced... less than $10 a running yard from a BIG WIDE bolt (cant remenber exact width, but it was much wider than normal fabric store goods.
--
From: "John & Kelly" Sender: Star45@yahoogroups.com Subject: RE: [Star45] Sails - colors

I have built US One Meter sails from spinnaker cloth purchased from Sailrite.

I used .5 oz which is only available in red, white, and blue, but .75 oz is available in a multitude of colors.

The part I like best about these materials is you can buy a role of C3 spinnaker tape (pricey at $25.00) and build a set of sails without sewing a stitch.

They actually use C3 to tape together the body seams of full scale spinnakers so Im pretty sure it can take just about anything a model can throw at it.

Ive built two sets of sails and only used about 10% of my role of tape so that $25.00 will go a long way.

At about $12.00 a yard, spinnaker cloth is twice the cost of fabric store ripstop, but spinnaker cloth is coated with resin that makes it far more stable and eliminates all porosity (wind can blow right through ripstop). I also havent tried using C3 on plain ripstop, so I cant say how the bond will hold up.

For cutting fabric like this Id use a hot knife. I bought a $4.00 40watt soldering iron at the local mega-mart, removed the tip, hammered it flat, and put it back in. Cutting works best over a smooth heat resistant surface. I use my glass topped kitchen table (when my wifes not home).
--
Read More..

Jumat, 06 Mei 2016

S45 Construction Deck

4/19/2007 John Fisher just finished the deck rigging last night on his latest boat. The boat is set up pretty simple. Open loop with elastic. Winch is below deck, but the same rigging setup can be used with an on deck winch, just substitute a turning block for the through deck block.

The sheets go forward to a block on a bridle for the main sheet. The jib sheet and elastic go through a double block attached to the chain plate to keep things from rubbing on the mast, then through an adjustable double block forward. The jib sheet then goes back to a deck mounted block. The elastic is then hooked to a loop on deck. John put a hook in the elastic so he can release tension when in storage.

Chain plates and mast step are laid out per Scott Rowlands tuning guide.


In tweaker photo bellow you can see the tweaker servo and winch mount.

Read More..

Senin, 25 April 2016

Three Bolger boats under construction at once

Here are a couple of photos showing three Phil Bolger-designed boats under construction in our old shed, all at the one time (there were three other boats being built as well!) To paraphrase somebody else, "I can remember doing it, but I cant remember how!"

The boats in the photo are two of Phils Hope design (see last posting) and a Harbinger. Phil Bolger has often been associated with what some people call "Bolger Boxes". Well, the boxes are works of art in their own right, and demonstrate a rare understanding of hydrodynamics, allied with the application of common sense - but none of the three boats shown here could be called boxy!

Two examples of Hope (foreground and upper-left) and one example of Harbinger (upper right)
Here you can see the wooden pattern I made to allow for the casting of a bronze "Y" shaped propeller strut.
The shapely bow of one of the Hope designs in slings. The cuddy-cabin design was mine, as was the clinker construction plan - but Phil Bolger was consulted in writing and approved of the alterations.
Read More..

Little Egret under Construction


John Hockings has started construction of the Little Egret I designed for him, and he is making spectacularly fast progress and doing a wonderful job. This is his first attempt at Stitch-and-Glue, although Little Egret uses a combination of S&G and traditional skiff construction. Here is a link to Johns thread on the Woodenboat Forum - be sure to check all of the pages as the thread is already onto page two, and will soon be on a third page, I think.

http://forum.woodenboat.com/showthread.php?139737-Little-Egret-an-Egret-style-day-sailer

Ill be continuing to watch the project with great interest, as this boat is significant.
Read More..

Rabu, 20 April 2016

Woode boat Construction glues and adhesives

John F. Howard (Star-45 discussion forum, July 31, 2006)

"Gorilla Glue does foam a bit, but nothing like foam-in-a-can and has minimum stink. Forget trying to smooth things out, the foam is very, very sticky and keeps growing until it sets up (about an hour) at which point it will still be a little soft (keep clamped for 3-4 hours). Any squeeze/foam out once hard, can be cut, chiseled or sanded smooth. Run a strip of tape along the edge of the glue line and most of the foam out will end up on the tape. The best joints are tight ones that use a minimum of glue. For narrow or thin pieces (planking), squeeze out a little puddle (just enough to use in 15-20 minutes) and use a Popsicle stick to spread along the edges. Wear gloves, the stuff stains and is sticky. GG is great for laminating larger areas (spread with an old credit card or playing card)."

"If you use epoxy resin such as West Systems (best, you can adjust the cure rate with the different hardeners) or one of the 30-minute or longer (5-15 minute never gets hard and remains rubbery) such as sold by Great Planes or Tower, stink will not be a problem. The polyester resin does STINK in a big way, it what you can smell in a new fiberglass hull.
CA glues are ok for "tacking" stuff in place until the epoxy sets up, but watch the fumes. CA will fail if used in a wet location for long and also cause a problem with the wood accepting stain. Work with plenty of ventilation and or respirator and wear gloves with any of the above glues and resins, staining of the skin and sensitivity, either skin and or breathing can occur."

"These are base on my experience with the glues mentioned (full size boats, cabinet work and models). Yellow glue such as Titebond or Elmers Carpenter Wood Glue (not waterproof) works fine when encapsulated with epoxy (cedar strip canoe builders use it all the time)."

{ http://groups.yahoo.com/group/Star45/ }

Phil Geren adds a warning note about Glue Fumes:
I have a serious allergic reaction to CA fumes - causes fluid to build up in the lungs, like pneumonia. I still use it, but with a fan blowing air between me and the work. Trying to avoid it.

Phil Geren on Gorilla Glue:2006 August 1
Is it rock hard or rubbery when dry?
I bought some, but have the same reservations as Dave M about foaming, trimming, and sanding. If it doesnt sand well, the finished product wont be as good as what I am aiming for.
Read More..

Jumat, 11 Maret 2016

Deck frame construction

During December of 2010, Richard felt it was time to build the deck structure. There seemed to be a fine line between trying to do as much as possible in the wide open space of the deckless hull, and trying to figure out how all the lower structures would tie in to the deck and cabin.


The inside of the sheer at the bow was routed and cut away to accept the breast hook.


When epoxied in place this 6 layers of 1/4" plywood, glued over a curved form to match the deck camber, adds great strength and rigidity.


The Sampson posts also needed to be securely attached to the inner bow stem. Of course, a pretty laminated piece was created.


African mahogany solid stock was used for laminating the deck frames. We liked the color and durability.


1/4" strips were ripped from the 2" thick plank.


A whole bunch of strips....


As the actual arc of the deck does not change from stem to stern, the frames could be glued up on jigs. The jigs were created by screwing angle iron on to the old lofting table.


After the epoxy cured, the sides of the frames were cleaned up with the planer.


Much easier the sanding by hand.....


A dove tail joint was needed where a frame intersected another frame. At the sheer, the frames were fitted into slots, every 9".


A simple jig worked for routing the edges of each dovetail.


Then a dovetail saw was used to make the angled lower cut.


The lower end is cut away.


This leaves the dove tail.


The lower edge is rounded to fit snugly into the receiving hole.


A receiving hole was mortised into the other frame.


These are the slots that were cut by hand into the sheer. They are every 9", and no jig could be used since they arent square to the sheer. The angle changes slightly as the sheer rises toward the bow.


Each frame was marked, cut to length, and each end joint appropriately shaped depending on its placement. It was then sanded and epoxied with numerous coats.

Richard brainstormed about how to shape the carlins, the fore and aft side frames of the cabin. We wanted a curved cabin side, and it also needed to follow the rise of the sheer. He decided to use the actual sheer of the hull as the jig.


He needed assistance from Quinn to handle the long pieces and the clamping in a timely manner. Epoxy was applied to all strips.


Rolls of wrap were used to loosely hold the strips together.


Starting at the center and working toward the ends, there was still enough room for movement of the strips as the bundle was bent and then clamped.

Off to the jig (the hull).


Through the shop, around the lofting table, and up on the hull.

The outside of the sheer had been covered with clear plastic to keep the frame from sticking to the hull. The top was covered with blue painters tape. The plastic wrap around the bundle was left in place during the drying.....

The bundle was roughly positioned and clamped in place.


Then the bundle was tightly clamped in the exact position, starting from the center out.


Wooden blocks were used to align the strips with themselves and create a solid frame.


Can never have too many clamps in a boat building project ....


The carlins are allowed to dry on each side of the jig (hull).


After several days the clamps can be removed.

During winter in Montana, even with a well insulated shop, the temperature in the shop has to be kept moderate. Even though the temptation is to crank the heat and dry the epoxy faster, we dont want all our boat bucks to go to the propane company.


The athwartship frames were placed so that the carlins could be set on them and moved around to determine the cabin shape.

Since we plan to live aboard, we decided to go with a full length cabin versus the slightly more traditional split cabin. As we age, we decided that ducking down for about 3 feet to move from the saloon to the forward head/dressing/work area was going to get increasingly difficult. The central bulkhead and door will ultimately be raised to the height of the cabin. Since we were deviating from the drawn plans we needed to determine a pleasing cabin length and side deck size.


We placed one extra athwartship long frame over where the head will be placed, to make a slightly longer foredeck. At this point we could actually stand in the boat and feel the size of the cabin.


We played with moving the front of the carlins closer together and further apart. This altered the side deck width and also the visual lines of the cabin. Its all about the look.....it is a traditional looking wooden boat, after all....
A slight narrowing of the cabin at the bow seemed to give the nicest look.
Note the Sampson posts sticking up through the foredeck. They are only temporary, and Richard plans to replace them with white oak.


We settled on about a 22" finished side deck size. The carlins and the small side frames were dovetailed and fitted.

The carlins were supported in position while the side frames were fitted.

The cabin looks narrow from this angle....


Wider from here....feels good standing inside, and that is an important aspect. Sometimes there are too many decisions when building a custom boat...so many design features that all add up to the total package.
Read More..