Rabu, 27 Juli 2016

Calendar Islands Yawl Modeling Continued

Fleshing out the Calendar Islands Yawl

Modeling the Interior

While I am actually breaking out the geometry of the final 3D computer model, the interior of the "in-the-flesh" model was glued in yesterday and Ill prime it today.

Cutting out quarter scale bulkheads for Calendar Islands Yawl interior.

It never ceases to amaze me how everything just fits. Paper patterns are Spray77 tacked to 1/8" plywood and cut to the line on the bandsaw. Then the parts are glued into place with little to no refinement and they fit well. It makes this method of proving out the hull design quite efficient.

After hull turnover in actual full-size construction, this is what the boat interior will look like.

The beauty of kit construction, is that we set up stem, bulkheads, and transom on a CNC cut, self-jigging strongback. And after planking, we turn over the hull and the interior structure is already complete. In traditional construction, the molds would be removed and bulkheads fit in their place. Kit construction allows the professional and home-builder to skip the time consuming steps of making patterns and scribing in bulkheads.

After turn over, the tank tops are put in place. They play an important structural role in stiffening this very light boat.

Stay up to date with me as next Ill prime the hull and make paint choices. Furthermore, the cutting files will be ready for CNC cutting of the first kit. 


Read More..

Selasa, 26 Juli 2016

Misty Moonbeam

Misty Moonbeam a unique yacht which was designed and built by the late Michael Corbin.

For many years Misty Moonbeam was a familiar sight on the Medina River in Cowes.


A previous owner writes "If you would like to see more of the interior of Misty Moonbeam - heres the link to an Album created April 2010 - which can be viewed page by page without purchase. This was where she was berthed under her new ownership from 2007 to 2010 Chivenor, near Barnstable at the time. It was a pity the tide was out - but you cant have everything, it was a beautiful day. I was fortunate enough to be invited to spend a day on board, with a photographer friend who created the Album. Thats me on board in red"

"Misty Moonbeam was sold in 2007 and indeed has been recently sold on again. I would also refer you to a YACHT MARKET site, where Misty was advertised prior to the latter sale. This gives all her statistics and will give you a true figure of the amount of winches on board. This site will be undoubtedly removed soon as she is under new ownership as at October 2010."

"If you remember, she was originally a Wishbone Schooner - but the first buyer didnt know how to make use of the wishbone, whereby it was removed, re-rigged with a complete new set of sails."

"Here is the one and only picture of Misty Moonbeam under sail in the beauty of her original rig for which Mike had designed her It is not easy to get a photo of your own boat under sail - unless you are racing and surrounded by press photographers. Fortunately I alerted some friends she was in the West Country, and the rest is history. Thats Mike on the raised poop - with daughter and son-in-law on deck."


"May Misty Moonbeam continue to sail the seas. She was designed for world cruising and may she be admired the world over and live on in the memories of all who appreciate her individual beauty."

Read More..

Voice recognition software

I am writing this short post in order to test the voice recognition software embedded in Windows 7. It is my hope that I can write posts more frequently in this way and also answer my backlog of emails.

My primary work is boatbuilding and design and I am finding it difficult to keep up with the administrative work which articles, emails, and the blog entail.

At the moment I am teaching the software how to recognise my Australian accent, and it seems to be having great difficulty!

There will soon be posts about a Water Rat being built from 4 mm plywood which is coming along very nicely indeed, and I will be posting some photographs of the Scram Pram which is almost completed. The windows are in and we hope to have the boat in the water within a few weeks for trials.

The voice recognition software seems to be working, but please be tolerant of my mistakes!

Ross Trinders beautifully built 4mm Water Rat


Scram Pram with her windows dry-fitted, and the decks screwed down on bedding compound

Now, doing all of that with voice-recognition software was VERY time consuming, but stand-by for an improved service!
Read More..

Senin, 25 Juli 2016

This blog is being moved

This blog is being transferred to my own website. All the posts have already been copied over ...

http://www.storerboatplans.com/wp

There is a good search function on the top right of that page.

For discussion, podcasts and more on boat design, boat plans, boat building, boat repair, plywood, epoxy, amateur built boats, sailing boats, canoes, kayaks, rowboats, yachts and more.

Best wishes
Michael

for General information
FORUM NEWS / BLOG VIDEOS PLANS
SIMPLEST BOAT BUILDING HELP PODCASTS PAST PROJECTS

Order Plans Online - OZ/NZ
Order Plans Online - USA
Order Plans Online - UK
Order Plans - Africa
Order Plans - Hungary

BOAT PLANS LIST
Canoes, Sailing Canoe, Sailing Skiff, Rowboat, Motorboats, Fishing Boats, Canoe Sailing rigs, Outriggers, Riverboats, Canal Boats, Punt

FAQ - Useful info
Epoxy and Methods
Saving Money
Design
Boat Building methods,

FREE PLANS

DESIGN PROJECTS
Solarboat - Mundoo 3
Norwalk Island Sharpies
Custom Keels & Foils
Custom Rigs & Sailplans
Balsa Strip Canoe 12lbs/5.5kg
Fenwick Williams Catboat
Steam powered strip canoe
Solar powered Cruiser

BOATBUILDING CLASSES
Adelaide Australia - 12 days
April and October

LINKS PAGE

ORDERING PLANS and Prices
plans Agents

Magyar nyelv? oldal
? ?????????
? ?????
Deutsche willkommene Seite
Page daccueil française
Pagina di benvenuto italiana
Página de recibimiento española
??????? ???????????
????????? ???????????

Site Map
Read More..

First Mate Side Seat Rails

At the end of June 2011, I published a post about my idea for moveable side seating in cruising dinghies. The idea is that side seats can be used if prefered (although I like to sit down low in the boat with my weight near the windward turn of bilge) and can also be removed at a moments notice. Most importantly, if they are slid into the centre of the boat they make an excellent sleeping platform, well above the bilge water.

The Phoenix III built by Paul Hernes, showing the side seats in the standard location.............. 
...........and slid together to form a nice sleeping platform............
.....or removed altogether.
You can find my original post at this address

I am continuing to work intermittently on a First Mate in my workshop - she gets attention when glue is curing on other jobs. Last week I installed the rails to carry the removable side-seats/sleeping platform, and Im delighted to say that in First Mate, the seats are more than 26 inches wide at the upper part of the body when slid together. Here are a few pictures of the rails: -

Here is the seat rail glued and screwed onto the aft face of the midships frame. This frame is made from 12mm (1/2") marine plywood, with 38mm x 12mm (1-1/2" x 1/2") behind where the screws go through. The whole thing is very strong, and the seat rail would be fine with just a glue joint. However, the silicon bronze screws make it simple to position when the epoxy is slippery, so they may as well go in! The rails are positioned to carry a side seat which is 31mm (1-1/4") deep - these will most likely be 25mm (1") framing topped with 6mm (1/4") marine plywood.
A close-up of the aft rail, which attaches to the semi-bulkhead at the forward end of the stern seat (i.e. the "stern sheets"). The centre cut-away is just to allow positioning of the screw-in hatch to that particular buoyancy compartment.

Another shot of the aft seat rail with the rowing foot-braces on the floor below. These foot braces do double-duty as structural stiffening elements as well

This seating arrangement will make First Mate (and Phoenix III) very versatile cruising dinghies - my favourite type of boat bar none!
Read More..

Answers to a couple of recent comments

Here is comment received regarding Fleet:-

How much does she weigh?
What I like about flint is that the center of balance is over the center thwart making her easy to carry and light enough for this senior citizen to car top.


Well, I cant tell you how much she weighs because we havent weighed her yet, but the material thickness is the same as on Flint and the area of plywood is only 8.4% higher, indicating an 8.4% weight increase.  The Fleet shown in the pictures has a foredeck and inwales, but the standard Flint and Fleet have tank-tops on the foreward and aft buoyancy tanks, so it probably all evens out.

Based on just the plywood in the bare hull, the weight of Flint panels is 24kg(53lbs) and in Fleet the same is 26kg(57lbs). The centre-of-gravity of the hull panels (including transom without framing) is at 1.96metres forward of the aft perpendicular i.e. at the midships thwart near the aft edge.

The weight of any boat depends tremendously on the density of the materials used, and the attitude of the builder.
________________________________________________________________
In relation to my recent post on the virtues of the sprit rig with the jib set flying, Dennis Marshall writes: -

May I ask what the line is hanging from the peak of the sail?

Dennis is asking about the light line which can be seen in a number of photos, running down from the head of the sail at the peak end of the sprit

The light line is just visible in this photo
The line is a vang. I suggested that it be used in certain conditions when hard on the wind and when running free, to control the amount of twist in the sail, and (when running) to prevent the head of the sail from moving forward of the beam i.e. forward of a a line drawn at right angles to the centreline of the boat. If a sail moves forward of the beam, it is a sure invitation to a Death Roll.

The light line is run from the head of the sail near the peak of the sprit down to a thumb-cleat on the weather quarter and then to a little fairlead on the rudder head and then along the tiller to a small V-jamb cleat within easy reach of the helmsperson. When tacking or jibing, the line is flicked off the thumb-cleat and quickly moved to the one on the new weather quarter.  It only requires a light tension on the line (vang) to haul the head of the sail in to reduce twist in the sail.
Read More..

Love Love by Julien Berthier

French artist Julien Berthier created this boat. According to him, "Love love is the permanent and mobile image of a wrecked ship that has become a functional and safe leisure object".

Im not sure the Health and Safety Executive would agree with him about the last part.

Heres what the gallery that displayed it said.

"For this piece he adapted an abandoned 6.5 meter yacht so that it appears to be perpetually sinking. To create this, the vessel was split and a new keel was constructed allowing it to be sailed by Berthier at a 45 degree angle off the coast of Normandy. Love-Love, like much of his oeuvre, is impressive, poetic and humorous.

In this project, the artist invests his energies and resources into creating an art of fiasco, aiming in his words to “fix an object at the moment of its deregulation.” The image, and metaphor of the sinking ship is an iconic one – it signifies death, lost hope and sinking dreams. Berthier’s Love-Love freezes those sentiments permanently both celebrating and overturning them. On display in the gallery will be the boat itself as well as a series of accompanying photographs and documentary video showing the performance in Normandy."

Mr Berthier knows something most of us dont, though - how to make money out of old boats. He is reported to have sold this one for £50,000.

Love Love from julien berthier on Vimeo.

Read More..

A Dory for Gazela Primeiro and at the end tips on glass application

A while ago I received a nice email from Tony Souza regarding construction issues with a new dory he intended building for the old Portuguese barkentine Gazela Primeiro.

Hello Ross,
Thanks for your recent article "Stems and Trailers".  In that article you discuss natural timber vs plywood construction and show the merits of plywood glued lapstrake for boats that are dry stored.
Im trying to choose a construction technique to use for a reproduction dory that will be "dry sailed".  The dory is a Grand Banks dory of 17 feet overall, 13 feet on the floor. The new dory has to resemble closely the last of the three dozen Portuguese grand banks dories that sat on the deck of Gazela Primeiro, the 100+ year old Portuguese barkentine on which I am one of the all volunteer crew.  Last winter we patched and repaired the last dory, and this year Id like to build a dory to be used often for the teaching of boat handling, rowing, and dory sailing.  the boat handling includes launching and retrieving over the side using hand operated boatfalls. The new dory will spend most of its time stacked inside the old dory, the two as deck displays of what was used in long line fishing of the early 20th century.
As a matter of resemblance the new dory will have four frame sisters overlapped, removable thwarts, 5/8" cedar planking, solid gunwales, a mast step on the floor and two sets of oarlocks.
For ease of construction and in keeping with the dry storage idea I plan on using modern materials where I can.  The flat bottom will be Meranti plywood already on hand, no need to soak the floor seams closed before putting boat into the water.  The frames are already built from laminated ash. Tree crotch and buttress sections are too difficult to find.  I plan to epoxy the garboard plank to the bottom, glass tape and epoxy the inside seam.  After planking I plan to turn the boat over and glass the bottom and garboard with cloth.
After that long prologue we come to my uncertainty area, the clinker planking joints.  Its tempting to use lap-stitch aka ship lap joints, easily cut with a router and epoxy fastened.  On natural, i.e. not plywood, timber that may lead to splitting along the grain at the join.  Likewise dory lapped (rolling bevel) joints likewise glued might suffer splitting.  I should have said earlier that using modern glues and eliminating metal fastners is a goal.  The old dory is a pincushion of steel nails on the planking joints which has resulted in rusty streaks and rotten wood.  (Of course dories were not supposed to last more than a couple years in ocean service. Old dory is probably 40+ years old.) 
Would it be better to caulk the planking seams with Boat Life, a polysulfide, rather than epoxy fasten?  The frames are there to give cross grain strength.  With your expeience you might see that Im headed for problems not yet envisioned.
Any suggestions will be very welcome and gratefully accepted.
Gazela can be seen at
www.gazela.org.
A picture of the old dory is attached. 


Here is part of the text of my reply: -

I agree totally with your concerns regarding "hard" gluing of either "lapstitch" or dory-lap joints when using natural timber rather than plywood - I believe that they would definitely crack at the point where the planking thickness returned to single-plank. Harry Bryan wrote about the matter when he did a couple of articles for WoodebBoat Magazine about the building of his Daisy design. She had either double-planked cedar (glued with epoxy) for the bottom, or a single sheet of plywood. The topsides were planked with lapstrake cedar planks in the normal manner (I think using copper clench nailing from memory). The important thing in our context is that he expected her to be dry-sailed, and after completing the planking in the normal way, he dragged a sharp, flat-blade screw driver along the underside of the lap on the outer side of the planking. This produced a sort of square-shaped groove of about 1/8" x 1/8" in the underside of the lap. He then filled the groove with a bead of polyurethane (I would use 3M 5200 or Sikaflex 292, using a polyurethane-specific primer)

Having said all that, I wonder whether you could just glue the entire lap with polyurethane (I dont know enough about polysulfide to say anything about its adhesive qualities where no fastenings are used). The polyurethane is strong enough, but I dont know whether a fully-glued lap would allow enough movement to overcome the cracking problem, even given the flexibility of the compound - but my guess is that it would be ok, especially if the glue-line was thick.

If I was doing it, Id go the copper-fastened route, with the polyurethane (or polysulphide) run into the groove under the lap.

I think that the garboard arrangement you propose would be fine. The glass on the outer face should supply cross-grain reinforcement, and the tape on the inside will extend some distance beyond the vulnerable line of intersection between the inside faces of the bottom and the garboard.

On two boats I built (one of which ended up in the Jody Foster film, Nims Island - see the recent comment made on Duckworks http://www.duckworksmagazine.com/10/reports/may/index.htm ), I made the bottom from Western Red Cedar glued strip, continuing around the turn of bilge, after which I continued the planking as plywood glued lapstrake. I cut the bevel on the bottom planking to accept the first lapstrake plank before glassing the bottom. When glassing the bottom, I continued the glass right around and onto the bevelled face. This meant that when the first plywood plank was glued on, the glass was sandwiched between the WRC strip planking and the inner face of the plywood - the aim being to prevent splitting in the WRC.  This explanation is a bit clumsy, but I havent got time right now to do a sketch. In your case this will not be necessary, as you will have the glass on the outside of the cedar planking anyway.

??
Western Red Cedar bottom planking
???
Bottom covered with 400gsm (12oz) double-bias glass and the first two planks of plywood lapstrake attached - the first plank going over the glass, which itself had been laid over the bevelled edge of the cedar bottom planking.
???Here is Tonys latest up-date: -

Hiya Ross,
Here are three pix of the dory project to date.  This boat is a copy of the last original belonging to Portuguese fishing barkentine Gazela Primeiro.  You can see more pictures on
www.Gazela.org and my facebook page. My version of the dory has a meranti plywood bottom and white cedar planking over laminated ash frames.  The gunwale and cap are white oak. The dory will essentially be dry sailed i.e. living on Gazelas deck most of the time and occasionally be used for crew training and exhibition at home and ports of call.
After corresponding with you some time ago I took your advice and epoxy joined only the garboard plank to the bottom.  The rest of the construction has followed traditional methods. The upper edge of the garboard and the remaining planks are dory lapped and copper riveted.  Planks to frames are joined with Si bronze screws.
I think we talked about covering the bottom and up to the upper edge of the garboard with synthetic cloth and epoxy. 
Now areas where I could use advice:
What cloth would be appropriate? I dont think the dory will ever see a beach, but it might. So a light cloth should do.
Is there an advantage to graphite additive to the epoxy?
Any tricks to applying the cloth?
Thanks for your help,
Tony Souza


And part of my reply: -

Dear Tony,

Thanks very much indeed for the up-date, and for the nice photos. The boat looks super to my eyes, and Id love to take her out in the rough stuff - preferrebly with some weight in the bottom to represent the ballasting effect of a load of Cod!

My appologies for the delayed reply - we have been recovering from the devastating flash-flood which wiped us out on January 10, and priorities tend to be re-arranged!

For the cloth, the simplest would be 200gsm (6oz) woven glass. This is light and easy to use, and gives a good level of protection, and more importantly, provides a sort of screed to ensure an even thickness of epoxy. Dynel is also a good option (4oz, I think, but you would need to check with the supplier). Dynel is bulkier than glass for the same weight, and it has superior abrasion resistance - I like it on decks - but it doesnt have the tensile stiffness of glass so it will have less structural effect on the garboard-to-bottom joint. For a hefty boat like yours which may get handled roughly, Id give serious thought to using 400gsm (12oz) double-bias glass cloth. It isnt woven, so it takes bends fairly well, and with the fibres aligned 45 degrees/45 degrees, every fibre crosses the longitudinal joints. It is cheaper than woven glass, but is heavier than the normal 6oz stuff.

I normally use the dry application method (for weights up to 12oz). I lay the cloth over the dry, sanded, and vacuumed surface, and them smooth it into position with a dustpan brush or a wide, dry paintbrush. Tape any troublesome edges down with temporary bits of masking tape. Then start by mixing small quantities of epoxy and pour them onto the glass (or Dynel) and spread them with a squeegee - I use rectangles of 1/16" model aircraft balsa as they can be bent along the grain if required, and the corners dont snag on the glass.  Dont press too hard, as you will end up aerating the epoxy and making it go creamy with minute air bubbles (just like what happens when whipping cream). Just use a gentle figure-eight sweeping motion to get it out onto the surface. Dont fuss about getting it to wet-out - that will happen automatically. Keep on mixing, pouring and spreading until the entire surface is covered. Small batches are good, as they dont heat up so rapidly in the container.

When the surface is covered, use disposable brushes and/or disposable foam rollers with about a 1/8" nap to distribute the resin evenly. I use dry brushes and rollers - they pick-up from the excessivcely wet areas and put down in the dry areas. When all is even, use the squeegees again (held at about 45 degrees to the surface) to scrape off excess resin so you end up with just the wet cloth, but no visible pooling of liquid resin.

After the epoxy has gone off enough to be certain that the cloth wont float up off the surface - this depends on temperature and rate of cure - but when it gets to a "green"state of cure, lay on several more coats of epoxy to fill the weave so that when you finally sand the surface (after removing any amine blush with water and cloths, sponges or Scotchbrite pads) you are only sanding epoxy and not going through to the glass.

Have a look on my website under the button labelled "First Mate Photos 3" for a brief pictorial demonstration - the thumbnails enlarge if you click on them.
Read More..

Minggu, 24 Juli 2016

About something you really need

Something you might want to think about, a bit of asshat humor, and in the "Wrong then Wrong now" department...

I dont, as a rule, make pronouncements of the "everybody needs to have this" sort but every boat really needs some sort of emergency rudder that works if youre sailing out of cellphone range.

Ya think?

Fact is, building an emergency rudder that works does not cost a lot or take much skill and all of the information you need is available here for free.

That being said, there are folks who just dont GROK the DIY vibe or who are unwilling to spend the sort of silly-expensive costs of having a custom emergency rudder fabricated... Luckily for these folks there is a new emergency rudder that seems to make a lot of sense called the OceanSteer Emergency Rudder.


While not exactly cheap compared to a DIY affair it is much more reasonable than a custom fabrication. Better yet its designed to fit into a couple of flat packs so can fit into a cockpit locker or under a berth which makes a heck of a lot of sense. Definitly worth checking out.

Listening to Motion City Soundtrack

So it goes...
Read More..

Peter Duck

Peter Duck is a character in one of Arthur Ransomes famous children’s novels, in later life he commissioned Jack Laurence Giles to design a comfortable cruising ketch which was named after the character. The design was commissioned just after the war in 1945, built by Kings of Pin Mill in Suffolk she was completed in 1947


Ransome is alleged to have requested “a sort of marine bath-chair, a minimum of work to sail and yet provide the maximum comfort for two.” Whether Laurence Giles succeeded is not clear, but for whatever reason Ransome didn’t take to Peter Duck and sold her after only 3 years in 1950.


Although not a production boat, over 40 of these ketches were built. LOA is 28 feet 3inches long with a draught of 3 feet 6 inches and a beam of 9 feet. The original boat was fitted with a Stuart Turner engine. The detailed fit out of each is varied, but the overall design is recognised for its passage making ability even in heavy weather. The easily handled ketch rig made the boat popular with single hander sailors.

The original Peter Duck still survives, indeed flourishes under family ownership who have been custodians for much of the past 50 years.

Read More..

Sailing Model AMYA Star45 Class Construction Deck s Hatches

from John Fisher:
Attaching deck to hull

John Fisher photographer


Hull with deck mounted:

John Fisher photographer


--------------------

HATCHES:

From Phil Geren:
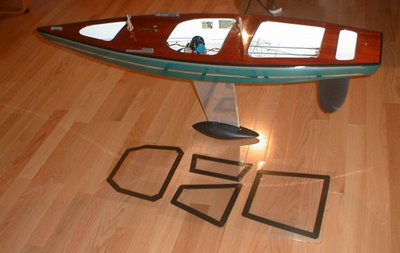
The simplest hatch cover solution I have found for Star 45 is to cut a piece out of Presentation Cover vinyl, which cut-out is shaped like the hatch opening but 1/4 or 3/8 of an inch larger on all sides. Then, apply electricians tape (1/2 or 3/4" wide) all around the perifery, so that half the tape is on the vinyl and half is hanging over the edge.

Presentation Cover vinyl which I get at Office Depot is about 15 cents a sheet; it is about 0.008" thick; it is slightly over 8.5X11" in size; a full sheet weighs about 16 grams; it is stiff, but flexible; it is crystal clear, but if you want it opaque, just wet sand it with #400 grit wet or dry sandpaper.

Position the hatch cover over the hatch so that the tape extends evenly past the hatch opening an equal distance all around, and then just press on the tape to stick it to the deck. Its waterproof, durable.

You can make spares and stick them to another piece of vinyl and carry that with you to the races. That keeps spares nice and flat and keeps the tapes sticky side clean for future use. A set of these hatch covers usually lasts me all season. At lunch, I take one cover off to allow the boat to dry out, sticking the cover to a dry vinyl sheet to keep the tapes sticky side clean.

Photo is Star 45 #778, freshly rebuilt for the Nationals this year, and a set of covers on the floor next to her.


Phil Geren photographer


--
from Uncle Dave:
I pulled one of my old Star45s from the attic and have it here in my workshop. It has a fiberglass Sirius 45 hull, a aircraft ply deck and aluminum keel fin. Unfortunately it is not one of my finest examples of workmanship or painting. However Ill suffer the embarrassment and use if to show some one style of hatch construction.

Carrying around a model around out of the water is no big deal. Taking a model out of the water can be something else. You first need to hang onto the model. Then find a place to take hold to lift the model. This is one of the reasons I have used easily removable hatches. You can grab the model through the hatch, fingers under the deck and pick it up. Of course a thin ply deck the model deck and hatch construction needs to be strong enough to withstand pulling on the deck and lifting a twelve pound plus model. Therefore I braced my decks around hatch areas.

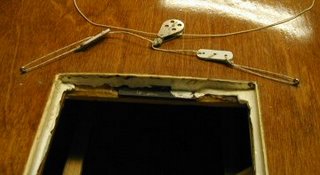
First I built a flanged frame for the hatch to sit in that also extended under the deck and attached to the deck bracing.
dlm_hatch_a.jpg

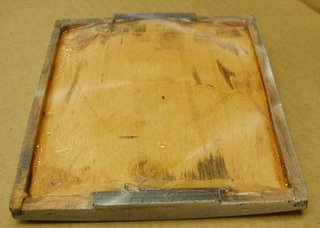
Then I built a hatch cover based on the size of the hatch. Initially the hatch cover was made to fit very loosely in the hatch. I then took some silicone (tub seal or similar) squeezed a bead around the shelf/lip of the hatch. The covering the hatch opening with food wrap poly sheeting Id push the hatch cover in place down into the silicone. This made a nice water tight gasket around the edge of the hatch. After waiting a day Id remove the plastic, trim and silicone that showed topside. With the silicone dry, pop the hatch cover in place and check the fit.

dlm_hatch_b.jpg

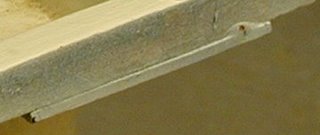
I placed a strip of magnetic tape on either end of the cover and on each end of the hatch frame.

dlm_hatch_c.jpg

When the hatch cover and hatch mag tapes touched they pulled together. This magnetic tape is neat stuff you can pop the cover in place and it will stay put.

Typically I made my hatches about 4"X5" giving me plenty of deck to the sheer.
fixed_travelersml.jpg

I heavy weather if the model might go over on beams end Id cover the seams with tape just to be extra watertight. A 4X5 hatch gives room to get inside, adjust winch, radio etc, and to remove any water that got into the bilge while sailing.

Read More..

The Goat Island Skiff Project Begins


Michael Storers Goat Island Skiff is a GREAT boat. We decided to build one for ourselves and use the boat as a test for producing high-quality, perfectly fitting kits to sell to amateurs and other professionals with little time on their hands. The goal for these kits is that they produce a hull with perfect lines that have been adjusted by a professional so new boatbuilders can get a fair hull that goes together easily. Every boat needs refinement. With our patterns, a CNC file will be made, and CNC kits will be produced. With Storers thorough manual, a new boatbuilder can build a great boat for themselves and enjoy doing it because things fit and much of the tricky work has been done for them. Time will be saved and boatbuilders can get on the water sooner.

Clint modified the boat by adding a mizzen, making the boat more along the lines of a sail-and-oar boat and more easily singlehanded.
Read More..

Knud Reimers Tumlare or Tumlaren


unattributed


Gokstad Faering


courtesy Vikingskip og norske trebåter


Knud Reimers


courtesy Swedesail


An original Reimers drawing of Tumlare

unattributed


unattributed


unattributed


At 10,000 pounds of Nordic pitchpine and steam bent oak frames, Egret shows some power in a breeze. This photo was taken on Clear Lake in Northern California where she served as the testing boat for Penofins Marine Oil Finish.

courtesy Penofin


Courtesy Knockabout Sloops


A great photo of her unique double cockpit arrangement that puts the helmsman aft at the tiller, the two jib winches are the only winches on the boat as sails were hauled aloft on their halyards by hand. Beside the winches are the running back stays. See the original compass on the strong back between the two cockpits. A single-cylinder diesel was added in the 1980s. Hidden appropriately under the cockpit and which greatly improved her handiness in tight docking situations.

courtesy Penofin


Courtesy Knockabout Sloops


History: Built over a five year period beginning in 1947 by Bob Stevens in his backyard ZEFIR (Swedish for Zephyr) was built as Knud Reimers designed with hot zinc galvanised frames and floors, with well seasoned Jarrah garboards and Queensland Kauri topsides. Three years later after Bob returned from Europe and the USA he found the hull structure in perfect condition to continue ribbing with hot steamed bent intermediate laminated Karri timbers, Spruce deck-beams and cabin and cockpit structures.

courtesy Classic Yacht Association of Austrailia


She was raced successfully in Port Adelaide by Bob until the early sixties and one other Adelaide owner then sold to Howard Fox in Melbourne in 1975 when her name was changed to ZEPHYR. As a “cruising” Tumlaren, much heavier than the majority of Tumlaren built in Melbourne and raced from Royal St Kilda Yacht Club (now Royal Victorian Yacht Squadron) Zephyr didn’t feature on the winners list in the very active racing regime of the Tumlaren Association. She was purchased by Kevin Read in 1993 after coming ashore at St Kilda and had two major restorations that replaced the galvanised ribs and floors and completely refurbished the hull and cabin and finished with a laid teak deck. She is now owned and raced by Anne and Karen Batson and is penned at the RYCV Williamstown.

courtesy Classic Yacht Association of Austrailia


A Tumlaren at the Hobart Wooden boat Festival

courtesy Dan Gadd


Arguably Knud Reimers Tumlare falls into the very narrowest selection of the most beautiful objects ever designed by the hand of man. Certainly she is the equal of the little Gokstad Faering pictured above (and of which she is undoubtedly a descendant), at least in elegance and seaworthiness, if not in simplicity. Reimers designed her in 1934 as a 20 square meter sloop for racing and cruising. Below are some thoughts on the boat from a couple of admirers.

From the sadly now defunct weblog Knockabout Sloops:

I have been rereading Lin and Larry Pardeys "Seraffyns European Adventure" and I came across this description of one of Larrys early boats, a Knud Reimers Tumlaren, that he raced and cruised when he lived in Vancouver.
When Larry was nineteen hed fallen in love with a twenty-seven foot Tumlaren class sloop designed by Knud Reimers and called Annalisa. Shed been built by the Kungsor yard near Stockholm in 1948 for the crown prince of Denmark. By taking a bank loan, countersigned by his father, Larry had been able to buy the completely varnished sloop and for five years he raced and cruised her around Vancouver. From the time I met him, two years after he sold Annalisa, Larry had raved about his magnificent sloop. Id almost grown jealous for Seraffyn as he described the extreme lightweight, scientific construction of the narrow, delicate Tumlaren. Seraffyn is twenty four feet four inches long with a beam of nine feet, and weighs close to eleven thousand pounds. Annalisa, at twenty seven feet on deck, was only six feet and displaced only thirty eight hundred pounds. As we cruised north through Swedens multitude of islands I came to appreciate the ideas behind the Tumlarens design. She, like the much better know Folkboat class, had been created for families who had protected waters to sail in. From a hundred fifty miles south of Stockolm north to Finland and east to Helsinki, a stretch of over six hundred miles, there are so many islands and anchorages that there is never a need to be more than four or five miles from land. The islands keep the seas flat with only occasional chop. Tiny villages dot the archipelagos so a family cruiser need carry only a few days worth of supplies. But the intricate passages around the rocks and islands require boats that are handy to tack and close winded, boats that accelerate quickly to use each puff of wind that whispers around the points and trees. These boats are built light to save money since they can only be used three or four months out of the year. We saw hundreds of them throughout Sweden and Denmark, and many are sailed without engines.

From Classic Yachting:
Tumlaren was once called “The most advanced type of cruiser in the world” by another famous yacht designer, Uffa Fox!
Tumlaren was designed by Knud H Reimers in an attempt to marry the characteristics of a “koster”, longish and narrow, with those of the faster Square Meter Yachts that where very popular in Scandinavia at the time.
Tumlarens characteristics are very easy for, aft and water lines. And the yacht was like so many of Reimers designs designed on diagonals, all on diagonals, all of which cut the sections squarely a technique that makes it easier for the boat builder to do the laying down and fairing up.
The yacht has a sharp bow and a rounded stern that founded the British expression “Tumlaren stern” and other similar nautical expressions.
Tumlaren has an aft cockpit with just enough room to hold a helmsman. The main sheet is attached to a traveler on a wooden strong-back that separates the aft cockpit from the main cockpit. The interior accommodations are very Spartan with full length settee berths port and starboard and a v-berth forward the mast. In total allowing her to sleep four but this is very cramped with today’s measurements of yachts. Aft the port settee is normally equipped with a small alcohol stove and storage lockers. Additional storage lockers are found to starboard.
Tumlaren was also designed and built in a bigger version, the Stor Tumlaren (meaning “Large Tumlaren”) and in total there where more then 600 Tumlaren built.
Knud Reimers Tumlaren can today be found on all the worlds’ continents and in at least 24 countries. In Australia it early became a one design racing class and the building and measurement where adopted to locally availble wood types.
Today Tumlaren are very sought after classic yachts and prices vary from a couple of 100 USD for renovation projects to 30 000USD+ for nice examples.
New built Tumlaren are still available and among others a there is a Finish company named “M-Yachts” who still build them in wood.

More on Knud Reimers here.
Read More..

Boat vs Whale

A couple of days ago a sailboat named "Luffin It" entered the harbor under tow. It was a Pearson 367, a 36 foot cruising cutter that is slightly larger than the Honcho. I have downloaded a couple of photos of a sistership, which I got from Yachtworld.com to give you a sense of the size and shape of this boat. Or you can visit this web site for a lot more information on it: http://www.yachtworld.com/core/listing/boatMergedDetails.jsp?boat_id=2013084&ybw=&units=Feet&currency=USD&access=Public&listing_id=1644&url=
Pearson 367
Sistership to Luffin It
Luffin It was leaving Bahia Tenacatita a few days ago when it came into contact with a whale. The result was a severely damaged boat and what I can only speculate was an unhappy whale. Fortunately, aside from a few bumps and minor bruises, there were no injuries to the couple onboard, and no visible injuries to the whale.
The whales tale was apparently caught between the keel and rudder. The bronze strut is about 1/2" thick and was bent nearly 90 degrees

I spoke to the owners about their experience and looked at the boat after it was hauled out at the La Cruz Shipyard. They were under sail around 1530, moving at a slow 3-4 knots on a course taking them out of the anchorage at Tenacatita, headed toward Chamela when the whale apparently attempted to surface, unaware that there was a boat above it. They felt the boat heave upward and thought at first that they had run aground, but then immediately saw the whale close alongside with its tail apparently still under the boat and caught between the keel and rudder. In its effort to free itself it flapped its tail several times before swimming away. It left the boat with a bent propeller shaft and strut, a chunk missing from the rudder, and structural cracks in the hull. This is what was visible from the outside. The owner told me that the internal damage was extensive. Many of the internal bulkheads and floor timbers were displaced as the hull flexed, knocking the head loose, jamming doors and drawers, and other damage. They immediately broadcast a mayday on their VHF radio and within minutes other cruisers in Tenacatita came to their aid. They got the leaks under control and eventually made it to La Cruz, partly under their own power and partly under tow.  You can read their firsthand account of the incident on their blog: http://www.sailblogs.com/member/luffinit/?xjMsgID=164231

We dont usually wear lifejackets when were sailing in light air and flat seas, and the crew of Luffin It werent either. Fortunately neither of them went overboard, but its a reminder that you never know when a life threatening emergency will occur, and its good policy to wear your PFD all the time. I dont plan to do that but well keep them at the ready in the cockpit in the future.

Whale sightings are very common in these parts this time of year. I cant count how many times weve been sailing along on a perfectly peaceful sea when suddenly a whale comes rocketing out of the water like a submarine launched cruise missile within a couple hundred yards of the boat. There is no warning, just an explosion of white water and a whales head 20 or 30 feet out of the water. Such displays inspire lots of respect from us. I did some searching on the Internet regarding how much power resides in a whales flukes and could not find an answer but it is clearly an enormously powerful animal, as the encounter between Luffin It and the whale shows.

How can sailboats safely travel upon seas that are also home to these magnificent animals? Aboard the Honcho we take a few precautions, but I dont think there is any reasonable way to prevent all accidental contacts with whales. During the nighttime hours we frequently run the diesel engine whether or not we have sails up. The hours of darkness are a good time to charge batteries, run the watermaker, etc. and I think the engine noise might help to let the whales know were in the neighborhood. Some people play music instead of running the engine. At any rate, Im fairly confident that sailboat/whale collisions are very rare, and most likely accidental. Still, its something to think about as we share the ocean with them.

Read More..

Sabtu, 23 Juli 2016

Fairey Atalanta

Decked out for the Royal Jubilee this Fairy Atalanta has its origin if not precisely in the Coronation year 1953 but is certainly a product of that post war period of English enthusiasm and innovation.

Fairey Marine applied hot moulded wooden construction developed in wartime, to production boat building, the technique enabled light weight and strong construction in the days before GRP became ubiquitous.

History recalls the Atalanta came about through the collaboration between Allen Vines a senior Fariey Marine executive and designer Uffa Fox, the Atalanta was conceived as a trailable shallow draft performance cruiser with the sea keeping capabilities and safety of a fin keel yacht.


There were three variants of the Atalanta, a 26ft (8.1m) hull with a slightly shorter cockpit and more headroom called the Titania (named after another Fairey flying boat), a larger version the Atalanta 31 (9.45m) and the Fulmar a 20ft(6.1m) version with a single lifting keel.


In 1955, Fox designed a 24ft (7.32m) prototype based on some of the concepts demonstrated by Vines in a development of the companys Albacore and after extensive trials the first 26ft (7.92m) Atalanta class boats were launched in June 1956. By 1968, when production ceased, some 291 Atalanta variants had been built at Fairey’s Hamble Point yard.

The Atlanta has a double berth cabin aft and a two-berth cabin, galley and heads forward. The self-draining cockpit has room for six, the unconventional but practical whipstaff tiller allows the maximum space to be utilised. Control lines, and halyards are handled from the cockpit and the headsails and anchor can be deployed by standing in the forehatch. The relatively modest rig and sail area needed to drive the lightweight hull make for easy sail handling as well as lower capital cost, with the additional benefit that the short mast is easily rigged or lowered for towing.


Many of these craft are still sailing and there is an active owners association plus you can follow Atalanta owner and fellow blogger Roy Woolley for first hand insight.
Read More..