Tampilkan postingan dengan label version. Tampilkan semua postingan

Senin, 13 Juni 2016

More photos of Fleet the planing version of Flint

The first example of Fleet, the planing hull version of Flint is getting much closer to launch day. In fact she has already been in the water to allow the marking of the waterline in preparation for the painting of the boot top - empirical data gathering!

Painting has gone ahead at a great rate, using the skills of people who normally apply coatings to aeroplanes and helicopters.

First real opportunity to view the hullform in the flesh.

 The hull shape is similar to the designs of the late William H. Hand, said to have been the inventor of the vee-bottomed motorboat. What made the William Hand designs significant was the way they would handle well at lower speeds when throttled back. Weston Farmer said of them, "They were steerable throughout their entire range of speed in following seas. The full planing boat is a dog in this department. Unless they are banging along full bore, you cannot steer them. And full bore in some seaways with this type of boat, demands Polident for the helmsmans teeth and metal brassiers for the ladies." ("From My Old Boat Shop" International Marine 1979.) Now, I think planing hull design has come some way since Weston Farmer formed his opinion, and there are some very fine designs around for full planing hulls, but the fact remains that for moderate planing and semi-planing speeds, a long, narrow Hand-style hull can be superb.

Getting ready for a trip down to the boat ramp for waterline marking. Gunwales are masked, as they will be finished bright using Deks Olje #1
First splash. Chines dont even touch the water when light. I hope that with a single oarsman on the forward thwart, the boat will be reasonably pleasant to row, even though she is a planing hull. Trim will be everything with passengers aboard.
25 litres of water in the aft well to represent the outboard and fuel, plus two people. The fellow on the helmsmans thwart is quite light, but the trim is very close to that predicted on the plans.
After the floatation tests, marks were made to allow masking-off for the boot-top.

Note the chinagraph pencil marks at the base of the stem.
Boot top masked ready for topside painting
Here you can visualise the fine, sharp lines up forard - she should give a smooth ride at moderate speed in a chop.
Almost ready for the water - just the oiling of the gunwales and breakwater/coaming to go. Test motor will most likely be a 6HP 4-stroke, but that is to be confirmed.

Read More..

Selasa, 31 Mei 2016

Fleet a Planing Hull Version of Flint

Back in about 2003 I was asked to design a rowing/small outboard boat for operations in a short, steep chop, with the emphasis on lack of pounding. The resulting boat, named Flint, has been very successful and popular. She is very easy to build - if you follow the assembly sequence - and a distictive feature of her hull is the fine, hollow sections in the forward part of the boat. What is amazing is that this shape can be produced from a single developed plywood panel. I have tried to achieve this sort of shape in the past using conventional projection of developable panels, but the geometry required to produce a hollow shape has always defeated me. The arrival of computer programs which have the ability to do the mathematics saved me from myself!

Proof that the hollow sections come from a single panel of plywood
The very first Flint, built by Eddie Guy
In recent times I have been approached by a number of people who have wanted to build a planing version of Flint. The hull of the original rowing/sailing/small outboard version is of the displacement type, although her fine sections and high length-to-breadth ratio mean that she can be pushed faster than her theoetical displacement speed which is 5 knots. On launching day we got her to 6.1 knots with two adults and two teenagers onboard, using a 2hp Yamaha at part throttle. Steve Dorrington got his to a speed of 6.2 knots under the urge of British Seagull 40-plus - certainly an achievement!

Steve Dorrington measuring his 6.2 Seagull-knots using a GPS. Note how Steve has to sit on the midships thwart in order to retain proper trim. In the case of the planing version, a helms-person should be able to sit aft and operate the outboard without a tiller extension.
Bruce Erney, on the east coast of the USA modified his Flint to take a 6hp motor and got her up to 17 knots, I think, but he needed to put trim tabs on to overcome the tendency of the displacement hull to point her bow at the sky. I was concerned about the exercise, but Bruce had many successful trips while fishing in the big waters.
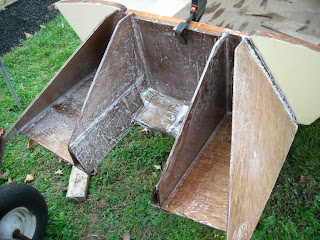
Bruce Erneys trim-tabs

One of Bruces many fishing trips in his modified Flint

Ive made a number of attempts at drawing a planing version of Flint and things were brought to a head this week when a friend/customer for whom I have great respect, asked me for a semi-disposable planing power boat which he and a friend could build over a weekend or two, to be powered by a 5hp outboard. He looked at few drawings I had on hand, and chose a preliminary sketch of a planing version of Flint, which I drew as a discussion piece for Rick Hayhoe a number of months ago.

Lines Drawing of the original Flint
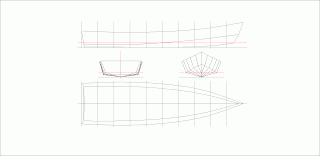
Lines drawing of the planing version, now called Fleet
In the above drawings you can see the substantial changes made to the shape of the hull aft of the midsection. I have retained the fine, hollow forward sections, although Ive increased the rake of the stem very slightly in order to reduce the severity of the bending and twisting of the plywood panels. With good-quality ply the hull is easy to assemble, but some people still insist on using poor-quality sheets in order to save a dollar, and end up encountering problems - hence the alteration.

My aim with this design is to retain the extemely light and simple style of hull as seen with the original Flint, and to have her run efficiently with nothing larger than a 4hp motor. This is important in my part of the world because we can operate with up to, and including, 4hp without needing to register the boat. The customer wants to use a 5hp, and specifically asked for a water-shedding foredeck and side decks under which he can store fishing gear. He intends taking her into the open Pacific off the Queensland coast here in Australia, and so adequate emergency floatation is essential. His boat will have built-in buoyancy under the sternsheets (aft seating which extends aft in a horseshoe arrangement),  under the midships thwart, and under the large foredeck. We have not finalised details of the arrangement, but here is a very preliminary sketch with the decks and seating shown in blue.

Here is a very sketchy drawing showing one idea of an internal layout. The final version is a fair way off yet, I think. The decks have very pronounced camber to aid in water shedding (those odd looking bits at the bottom are just working drawings to establish the height of the inner edges of the side decks at each station). Note how the cambered foredeck makes the sheer look much flatter than in the undecked original - this is an optical illusion. 
This little article should give some indication of just how much the character of a boat must be changed when the mode of operation is altered. However, a completely open version with a very small motor may retain the spartan feel of the original, while still performing in the semi-planing and planing modes. When the plans are complete and the boat tested, Ill post more details. For those who want to read more about the original Flint follow this link and this link.


Read More..

Selasa, 09 Februari 2016

Water Rat in 4mm Plywood Sailing Version

Water Rat is a 3 foot wide plywood kayak which can be built with a length of either 9 or 1010". This boat has an unusual, but attractive shape, and has proved to be quite popular. She was initially drawn by my friend Doug Laver back in the days when we were working at my workshop in Brisbane, and we had started experimenting with Gregg Carlsons Hull Designer program.The plans that Doug and I used originally were very difficult to interpret when it came to the shape of the developed panel sections, and I subsequently redrew them in a CAD program, incorporating a few variations and conventional dimensioning. You can read about the boat in a previous post here:-    http://rosslillistonewoodenboat.blogspot.com.au/2011/11/water-rat-developments.html

Dougs original Water Rat with my son, Steven, showing off the boats stability. Steve was about 12 then, and I havent seen this activity performed by an adult - but for a canoe she is a very stable boat.


Ross Trinder, from Toowoomba in Queensland, Australia, has built a number of boats recently including a Green Island 15, one of my First Mates, and a Water Rat. My good friend Al Burke also built a Water Rat, but used 4mm plywood instead of the 6mm plywood specified. Al applied some strategic stiffening materials and as you can see in the comments, his boat weighed in at 17 kg.

Ross Trinder is now building a second Water Rat, and this time he also is using 4 mm ply. Another variation on the theme being experimented with by Geoff Leedham in his boatbuilding program at a school in Alice Springs, Outback Australia, is to use 4 mm plywood for the entire boat with the exception of the bottom panel, which is made from 6 mm plywood.

This boat is a very simple project which involves very little time and very little money. However, it represents a great way to gain experience in the use of  epoxy and plywood, and the resulting boat is great fun to use, is very stable, and is surprisingly seaworthy in protected waters.

Ross Trinder has asked me whether it would be practical to fit Water Rat with a sailing rig. Given that she is 3 feet wide and carries her breadth out into the bow and the stern, I think that she would be able to carry sail reasonably well, and the only real challenge is to decide how best to give her some lateral plane. My first reaction is to make use of the leeboard, but Im beginning to think that an off centre dagger board would suit the boat very well. I will be doing some preliminary drawings shortly, and will post them here.

In the meantime, here are some photographs of the early stages of construction of Ross Trinders 4 mm Water Rat. You can also see Al Burkes finished 4 mm version via the link at the end of the first paragraph.

In this photograph the panels and bulkheads have been cut out accurately, have had holes drilled along the edges of the panels, and the boat assembled using plastic cable ties. After having ensured that there is no twist in the boat, Ross has placed a series of short tabs of thickened epoxy between the cable ties in the forward and middle sections of the boat.

Here you can see how the "tack-welds"of thickened epoxy remain clear of the cable ties, and are very small in cross-section. After the epoxy has cured, the cable ties will be removed and a larger fillets of thickened epoxy will be applied in a continuous run over the top of the "tack-welds" and have glass tapes laid over them while still wet.

Note how the bow and stern transoms, and the bulkheads, have centrelines marked. These are lined up with the centreline on the bottom panel, and as long as there is no twist allowed, the boat must come out the correct shape - even though there is no strong-back or mold.

Here you can get a good idea of the shape of the boat, and as long as the panels are cut out accurately, the shape of the boat is smooth and fair. This particular boat goes together very easily, and it may be possible to get away with as few as half of the cable ties you see in the photo.


Read More..